Blueprints
Use this function to define the skeletal structure of a CI, which includes properties of and relations to the CI.
In the main window, click Admin > SACM > Blueprints. The Blueprints window displays.


| 1. | From the Select Actions drop-down list, choose New Blueprint. |
| 2. | While viewing the New Blueprint window, complete the fields, referring to the table below. |
| 3. | When all selections/entries are made, click Add. |
Blueprint Fields
| Field | Description | ||
|---|---|---|---|
| Name | Name given to the blueprint based on the nature of the CI. This field can be edited. | ||
| Is Component |
When selected, the blueprint will be a component of a CI or else a Parent CI.
|
||
| Enable Versioning | When selected, all CIs of this blueprint are versioned. | ||
|
Is Integrity Check Needed |
When selected, ensures the corresponding properties are present in the CI. If not, a notification is sent to the configured user. | ||
|
Includes Blueprint |
The associated blueprint properties that are included. |
||
|
Property List |
Properties listed in the blueprint, such as IP Address or Hostname. |
||
|
Mandatory Properties |
Properties specified will be mandatory fields required while adding a new CI for this blueprint. |
||
|
Integrity Check Properties |
Ensures the corresponding properties are present in the CI. If the properties are missing, a notification is sent to the configured user.
|
||
|
Main Properties |
Properties included in the main property listing. |
||
|
Private Properties |
Properties added/marked as private, making them viewable according to a specified role. |
||
|
Private Property Visibility |
Roles for whom the private properties are visible. |
||
|
Primary Property List for Correlation |
The co-relator property for that blueprint. This is only for component type blueprints where Is_Components=true. | ||
|
Related Possible Components |
Components that will be part of a Parent CI. For example, a Network Adapter blueprint is a component of a Windows Server blueprint. |
||
|
Second Level |
User or group assigned to provide support, for example, during an escalation. |
||
|
Workflow |
Business rules associated with a workflow. | ||
|
Tags |
Tag for the configured item so that it can be found when conducting a search for a CI or discovered asset in the CMDB. | ||
|
Configure Main Page for CI |
Tabs that need to be shown in the blueprint type CI. |
Every Blueprint has its own SLA-defined based on its business factors. When a Root Cause CI is associated with an ITSM record, then the SLA of the blueprint is taken into consideration, provided a Custom Timescale and CI SLA are not defined.
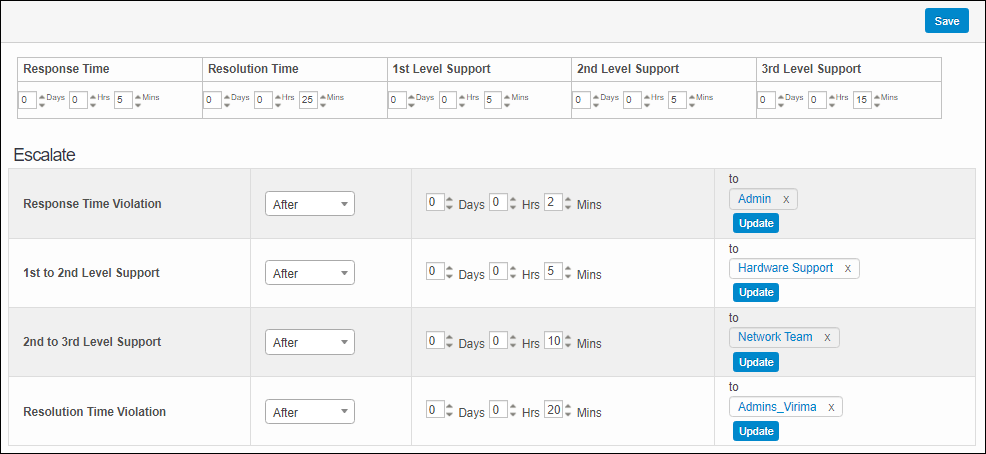
Use this function to configure response and resolution times for a CI marked as Incident, Requests, Changes or Problems that require resolution.
| 1. | In the main window, click a line item. |
| 2. | In the Details window, click the SLA tab. |

| 3. | In the Response Time field, specify the maximum amount of time that can pass before a response must occur. |
| 4. | In the Resolution Time field, specify the total time allowed to find a resolution. The Resolution Time cannot be smaller than the total of all the other response times (e.g., Response Time, 1st Level Support, etc.). |
| 5. | In the Support Level fields, specify the amount of time allowed for each support level to respond. |
| 6. | In the Escalate section, do the following: |
| a. | For the fields in the first column, specify when an action should take place, either Before or After the specified time duration has occurred. |
| b. | For the fields in the second column, select the amount of time that can elapse before a notification is sent to the users, roles, groups and departments specified. Multiple options can be selected. |
| c. | For the actions in the third column, click Add (new) or Update (existing) to indicate who receives a notification that activity has been escalated. Refer to Searching for details on how to make selections in the tabs. |
| 7. | When all selections/entries are made, click Save. |
| Not all functions include an option to edit record line items shown in the main window. |
| 1. | Navigate to the window containing the record to edit. |
| 2. | Click the line containing the record. The applicable window or dialog box displays. |
| 3. | Make the necessary modifications. |
| 4. | Click Save or Add, as applicable. |
When editing an existing item, other options may be available, such as adding Tasks, Comments, and Attachments and viewing History.
| The options change based upon the function; therefore, not every option may be shown. |
| Deleting is a permanent action and cannot be undone. Deleting may affect other functionality and information in the application such as data in configured reports, fields in windows, selectable options, etc. Therefore, be sure to understand the potential effects before making a deletion. |
| 1. | Click the line that contains the item to delete. |
| 2. | From the Select Actions drop-down list, choose Delete. If a confirmation message is displayed, take the appropriate action (for example, click OK or Continue). |
Related Topics
Other Functions and Page Elements